
Making the Jump Back Into 3D Modeling
November 8, 2016
3D modeling can be tough. I’m certainly no expert, but I do love the challenge. And lucky for me – the entire process is challenging.
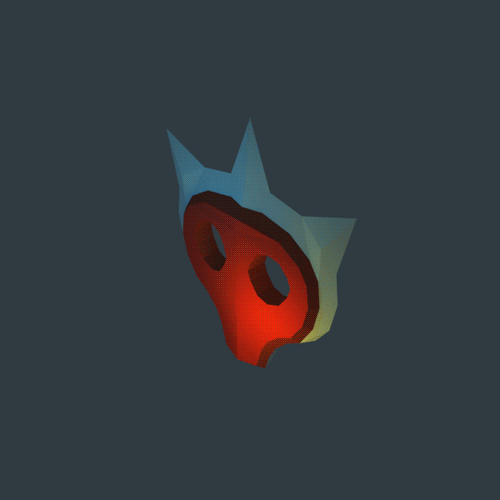
Let’s take the GIF up above. This is kind of a first prototype for a mask that will be used in Bright Ghosts. I don’t want to give too much away at this point, but I’ll say that sometimes it’s better to let the imagine wander instead of giving away all secrets. The unknown is usually creepier than the known. Enough of that though, let’s talk process for a minute.
In order to make this model, I first had to sit down and sketch out some mask concepts. Great. Well, what’s the purpose of wearing a mask? What about the history of masks around the world, and their cultural significance? Thankfully, Wikipedia can help us answer these questions. The beginning of any task for me usually requires a little research.
Ok, now that we’ve done our homework and sketched out a few ideas – let’s scan those sketches and bring them into Blender. Now I need to trace the outlines of the shapes in 2D space. Once the general shape is made, I can begin to play with its 3D form. Since masks are typically flat, this part isn’t too exciting. The hardest part of the modeling process for this mask was cutting out the eyes. I probably need to do some tutorials on the best approaches for this – my end result, especially on the back of the mask is a mess of poly’s. But hey, it’s a work in progress.
Next, I need to light the scene. In this example, I added blue and orange lighting to cast some soft shadows and add some interesting visual depth. Once that was done, I unwrapped the model onto a UV texture, and exported the lines out to a PNG. I brought that PNG into Photoshop and textured the model. Bringing that back in Blender, I wrapped the texture onto a material and applied it to the model. Phew! We now has a mask, with ‘paint’ on it, in a scene lit with two lights.
Now it was time to create the video. I added an armature (bone) to the scene, and parented it to the mask. Next, I weight painted the mask so that when the bone was rotated, the mask would rotate as well. This was probably overkill for this example, but I wanted to refresh myself on armatures and weight painting – this is definitely the part of the process I like the least. Next, I opened up the Dope Sheet and rotated the mask along its Z axis 360 degrees at specific keypoints in the timeline. I opted for a slower rotation with a bit of default bezier easing.
Finally, I added a camera to the scene, positioned it in a way that framed the mask nicely, and exported an image sequence (basically 160 different images). I then took this image sequence into Photoshop, and converted it into a single timeline (roughly 30 frames per second, or about 3.33 seconds of footage). I think optimized the layers, cropped the frames from a 16:9 native resolution to a 1:1 square (for aesthetics!) and did some color correction. I then used the good ole Save for Web tool, and exported as an animated gif.
And there you have it… a few nights worth of work for a 3 second gif. Yay art!